Note: This is a premium feature or service. This article only applies to your community if your Firstup contract includes this premium functionality. Please contact your Customer Success Manager with any questions about feature availability for your community.
Looking for training on our Custom Homepage functionality? Enroll in our eLearning courses in the Training Center: Custom Homepage and Custom Homepage Launch Strategy.
What is Custom Homepage?
Custom Homepage replaces the standard homepage in Firstup with a customizable homepage, giving you the ability to create tailored experiences that present relevant content to specific groups of employees. This helps improve engagement and supports clearer communication across your organization.
- Multiple Custom Homepages: Deliver personalized experiences to different audiences.
- Image Banners: Visually enhance homepages and direct attention to key initiatives with impactful imagery.
- Renaming Modules: Organize content clearly and intuitively with custom, descriptive module titles.
- Targeting Content Modules: Customize the layout of the homepage per audience to make sure the right content is front and center, saving valuable time.
Mobile Parity
Everything you customize for your web experience carries over seamlessly to mobile, ensuring a consistent and engaging custom homepage experience for all users, no matter their device.
- Unified Feed: The same sections, same order, and same impact as your web experience. No more disconnected mobile views.
- Modern Utility: A clean, usable banner with focused feeds replaces the cluttered "Discovery" approach.
- Smart Layouts: Hero and Grid sections automatically adapt to mobile-optimized Rows for a native feel.
- Social-Style Galleries: A fresh, 5-image dynamic layout designed to drive higher engagement on mobile.
Use Cases
-
The Frontline Efficiency Case (User: Frontline/Clinical Staff): Busy workers in hospitals or retail environments often have only minutes to check for updates. Instead of scrolling through a corporate feed, they land on a "Clinical Essentials" page that stacks only the topics relevant to their specific facility and role. By checking the Only include followed topics box, the page stays clean and distraction-free, surfacing only the high-priority updates they need to stay compliant and safe.
-
The New Hire Onboarding Journey (User: New Employees): Using audience targeting, admins can create a "Welcome to the Team" homepage specifically for employees in their first 30 days. This page features a large banner directing them to the employee handbook and content modules stacked with onboarding and training initiatives. This ensures new hires aren't overwhelmed by long-term projects and instead focus on foundational culture and tasks.
- The Corporate Campaign or Event (User: Internal Comms Admin): During critical windows like Open Enrollment or a Global Town Hall, admins can use the impact banners and priority logic to temporarily elevate a specific homepage. They can duplicate an existing page, add a clickable URL to the banner as a call to action, and set a minimum content threshold to ensure the section only appears once enough supporting resources are published, maintaining a polished brand presence.
Manage Custom Homepages
Brand Super Admins and custom roles with the Custom Homepage permission can create and manage custom homepages by navigating to Configure > Experience > Custom Homepages.
Custom Homepage Management
The custom homepage management page allows you to create and maintain your homepages in one central location. From this page, you can:
- Create New Homepages
- Edit existing homepages
- Duplicate homepages
- Archive or delete homepages
- Set a homepage as the default
- Determine homepage priority
- Navigate between the Active, Draft, and Archived tabs
Content Source
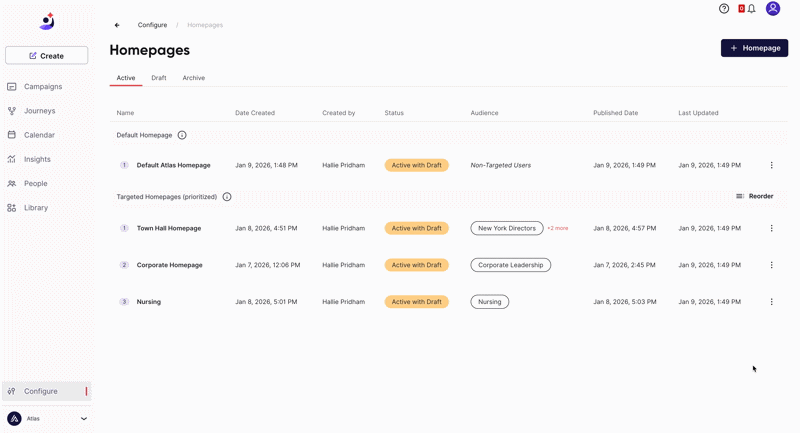
Custom Homepage Priority
You can control the order in which targeted homepages are displayed by dragging and dropping them into your preferred priority order on the management screen.
Homepage priority determines what users see when they qualify for more than one targeted homepage. For example:
- If a user belongs to the audiences for both the first and second targeted homepages, they will see the homepage placed higher in the priority list.
- If a user does not match any targeted audiences, they will see the default homepage.
By organizing homepage priority thoughtfully, you can ensure users see the most relevant experience.
Create and Edit Custom Homepages
There is no limit to the number of custom homepages you can create. You can create as many as your community needs.
Banner Image
You can enable a banner image (.jpg or .png) for your custom homepage to enhance branding and highlight key content. The banner appears above any configured shortcuts. If you choose not to add a custom banner image, your homepage layout will remain unchanged.
To ensure the best visual experience across devices, you can upload separate banner images for the web and mobile app. Providing a dedicated mobile banner allows you to further optimize how your branding appears on smaller, vertical screens.
Note: The mobile banner image is for the mobile app only. On mobile web, the web banner is used and scales automatically while maintaining its aspect ratio.
When adding a banner:
The web banner image (desktop/laptop and mobile web browser) is required
The mobile banner image (mobile app only) is optional - if no image is uploaded, no banner image will be displayed
Banner images should be cropped to the selected aspect ratio or recommended dimensions (Image Size) before upload
This flexibility helps ensure your branding displays clearly and professionally across both widescreen monitors and smartphones.
Make the Banner Clickable
If you want to drive attention to important content, you can make the banner image clickable by adding a URL.
When a URL is added:
- Users will be redirected to the linked content when they click the banner.
- The cursor will automatically change to a pointer (hand icon) when hovering over the banner, indicating that it is interactive.
This is especially useful for promoting announcements, campaigns, or time-sensitive information that requires user engagement or acknowledgment.
Design Flexibility and Best Practices
To give admins complete creative control, we do not overlay forced buttons or “Click Here” text onto banner images. The visual design is entirely up to the banner creator.
To ensure users clearly understand where to click, we recommend the following best practices:
- Visual CTAs: Include a “Learn More” or “Click Here” button graphic directly within your banner image design.
- High Contrast: Use bold, contrasting colors for call-to-action areas so they stand out from the background.
- Clear Messaging: Use short, action-oriented text (for example, “Register Now”) to encourage engagement.
Accessibility
When including a banner image, an ARIA label must be applied to banner images to provide screen readers with additional context about the banner’s message or purpose, improving accessibility for all users.
Add Content Modules
On your custom homepage, modules determine what content appears in each section. By configuring modules, you can control the type, placement, and organization of content displayed to users. To control the order in which modules appear on the page, simply drag and drop them into the desired position.
Define Layout
For each module on your custom homepage, you can select from four visual layout options: Hero, Grid, Gallery, and Row.
Hero, Grid, and Row layouts on the web will automatically transition to a mobile-friendly Row layout. For image-heavy sections—such as From the Community (see Gallery)—a dedicated mobile gallery layout is available to provide a more visually engaging experience on mobile devices.
As a general best practice, we recommend using a Hero layout for the top section of your homepage and limiting Gallery to one instance per page. Mixing different layout styles can help maintain visual interest and clearly distinguish sections. These recommendations are guidelines, and you can adjust them based on your design goals.
-
Hero - Larger images displayed asymmetrically.
-
Grid - Smaller images displayed evenly in a grid.
-
Gallery - Box with very large spotlight image and much smaller thumbnails; this presentation style is designed specifically for posts submitted by Members in the member experience and is recommended for a feed that is based around User-generated content.
- To create a From the Community module, enter “From the Community” (or your preferred title) as the module name and select the Gallery layout. For the content source, choose Latest, and ensure that only User-generated Content is selected.
- To create a From the Community module, enter “From the Community” (or your preferred title) as the module name and select the Gallery layout. For the content source, choose Latest, and ensure that only User-generated Content is selected.
-
Row - Larger images displayed in a row.
Name and Description
Enter a name and, optionally, a description for each module to clearly define its purpose and help users understand the content within that section.
Select a Content Source
To create a more dynamic homepage experience, content sources allow you to control which types of content appear in each module. Each module can display content from one content source only.
With the stacking feature, you can group multiple topics or multiple initiatives into a single content module. This enables you to consolidate related content into one section for easier browsing.
Note: You cannot stack topics and initiatives together within the same module. A module must contain either topics or initiatives—not both.
When you select the Only include followed topics checkbox, users will only see content from the selected topics if they actively follow them. If a user does not follow those topics, content from that module will not be displayed to them.
- Featured - Displays recently featured content, personalized to each user based on the topics they have access to.
- Latest - Shows recently published content from topics the user follows. This is one of the most personalized options, as it is limited to topics the user actively follows—not just topics they have access to.
- Trending - Highlights highly engaging content, personalized to the user based on the topics they have access to.
- Topic - Displays recently published content from a specific topic that you select. This option is not personalized, since the topic is explicitly defined and only public topics can be selected. This is a great way to prominently feature a topic that is important to your entire organization. For best results, keep this section fresh by publishing new content to the topic regularly (for example, weekly).
- Initiative - Displays recently published content from a specific initiative. Initiatives allow you to pull content from multiple topics into a single module.
- For You - Surfaces content targeted to users through audiences, rather than topics. Use this option if you frequently publish campaigns targeted to specific audiences without assigning them to topics.
Select the Content Type
You can use the Content Type setting to determine the type of content you want to display on your homepage: User-generated, Creator Studio-generated, or both. User-generated content refers content created by Members. For example, you may want to remove User-generated content from specific modules. This helps maintain a "corporate-led" feel for the main landing page while still allowing that content to be viewed once a user clicks View all to go deeper into the feed.
Note: Content published by Creator Studio users via the member experience is not considered User-generated content.
Minimum Content Threshold
The minimum content threshold determines how many pieces of content must be available before a module appears to a user. If you set it to 3, the module will stay hidden until at least 3 items are published. This prevents "empty-looking" sections on your homepage.
Additional Modules
You can enable additional modules to appear on a custom homepage. Content within these modules is automatically populated based on the associated topic.
Configure Settings
Custom homepage settings determine which users see each homepage. By configuring targeting and priority rules, you can control how different audiences experience your homepage.
Default Homepage
If a user is not part of an audience assigned to any of the custom homepages for your community, they will see the default home instead. To make a homepage the default, select Set as default. Only one homepage can be designated as the default at a time.
Audiences
Targeting a homepage to one or more audiences ensures that only users within the selected audiences will see that custom homepage.
If a user belongs to audiences targeted by multiple homepages, the homepage they see is determined by your prioritization order. The user will be shown the highest-priority homepage for which they qualify.
If a user does not match any targeted audience, they will see the default homepage.
Preview Custom Homepages
To preview a homepage prior to publishing, click Preview in browser. Note that you will be prompted to sign in to the member experience if you are not already.
Lifecycle and Deletion Policy
Custom homepages operate under three statuses: Active, Draft, and Archived. Firstup uses specific transition rules to protect the user experience and prevent accidental deletion of your primary homepage.
1. Status Transitions & Restrictions
The ability to archive a page depends on whether it is a Targeted Page or the Default Page:
- Targeted Pages: These can be moved freely from Active to Archived.
- The Default Page: This page cannot be archived or removed directly. It can only be replaced. To change it, you must "write over" it with a new page. The system will prompt you to confirm that you wish to replace the current Default Page.
- Active to Draft: Moving an active page to draft creates a "working copy" version. The original page remains Active (live) while you make changes to the Draft version behind the scenes.
2. The "Active to Active to Archived" Rule
For targeted pages, the transition follows a strict safety logic:
To move a page from Active to Archived, it must pass through an "Active-to-Active" replacement or a direct archival command. You cannot bypass these states to prevent live content from disappearing without a designated replacement.
3. Permanent Deletion Workflow
Because Active and Archived pages are protected, they cannot be deleted. If you need to physically remove a page from the system entirely, you must follow this specific sequence:
- Archive the active targeted page.
- Create a Draft from that archived version.
- Delete the Draft.
Note: Deletion is permanent. There is no recovery for deleted drafts. This multi-step process is an intentional safeguard to ensure no page is lost inadvertently.
FAQ
Can I work on a new design without my users seeing it?
Yes. You can save any page as a Draft. For existing active pages, you can create an "Active with Draft" state, allowing you to refine updates in the background while the current version remains live.
Can I recover a page I previously used for a specific event?
Yes. You can move pages to the Archive tab. This allows you to save seasonal or event-based layouts (like Open Enrollment) and reactivate or duplicate them later.
Are my Shortcuts managed within the Custom Homepage screen?
No. Shortcuts remain managed in their existing separate section. They use the same audience builder, allowing you to align your Shortcuts with your custom homepages if you choose.
How will Insights be shown? Will there be analytics for each homepage?
At this phase, there are no additional insights provided.
Video
For a visual walk-through and use case examples, check out our demo video on Custom Homepage.
Note: To view this content, you must allow cookies from this site. To update your preferences, navigate to https://support.firstup.io/hc/en-us/p/cookies and select Change your consent.
Comments
0 comments
Article is closed for comments.